Guide to Buying a Horse Float
By Megan Gundesen FairPlay Equine Founder/Director www.horseagreements.co.nz
It’s easy to get frustrated when searching for a solid, affordable second-hand horse float.
They are as scarce as hens teeth. Anyone advertising a well-priced float fitted with brakes and comparatively free of rust could sell a dozen every weekend.
They are as scarce as hens teeth. Anyone advertising a well-priced float fitted with brakes and comparatively free of rust could sell a dozen every weekend.
Unfortunately, many floats advertised are without brakes and have serious rust problems requiring expensive repairs. Inspect carefully to buy something sound and reliable. Or, at the very least, know what repairs are necessary to bring it up to scratch. The upside is - when it’s time to sell, if you’ve maintained it well, you will get good money back.
To start your inspection, look first at the construction.
To start your inspection, look first at the construction.

Construction
A float is, first and foremost, a trailer. It will have a draw bar and coupling, just like any normal domestic trailer. The draw bar of the float forms part of the chassis, which will be made from steel. A chassis must be strong enough to support, in the case of a two-horse float, a tonne or more of horseflesh. It must also support its own weight (a typical tandem-axle float will weigh between 750kg and 1250kg). The chassis must provide good support to the floor, which itself must be strong to support the weight of the horses. The chassis must also provide a good anchor point for a strong back door. Check underneath for signs of rust in the chassis, and rot in the timber. The frame of the float must then support whatever material is used to enclose it, both internally and externally. We’re all familiar with the materials used here: steel sheeting, aluminium sheeting, plywood, and fibreglass, or any combination of these. Fibreglass is usually used on the roof and is usually moulded to give a nice, aerodynamic front. It’s light, strong, and quite easy to repair. All the materials you need to repair your float shell can be purchased quite cheaply. Just look under fibreglass in the yellow pages to find a local stockist. Aluminium has the benefit of not rusting. It is light and easy to work with but is softer than steel sheeting. You’ll find plywood either on the floor, where I would expect to see 30mm marine-grade ply, or on the rear door (where it should also be thick to withstand kicks), and probably on the sides of the interior, where you can get away with thinner plywood. Many floats will have floorboards instead of plywood. These should be 50mm thick and well supported by the chassis. All-up, a loaded two-horse float is likely to weigh around weigh two tonnes. |
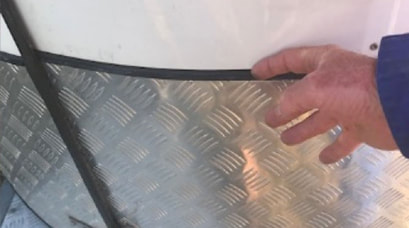
Rust
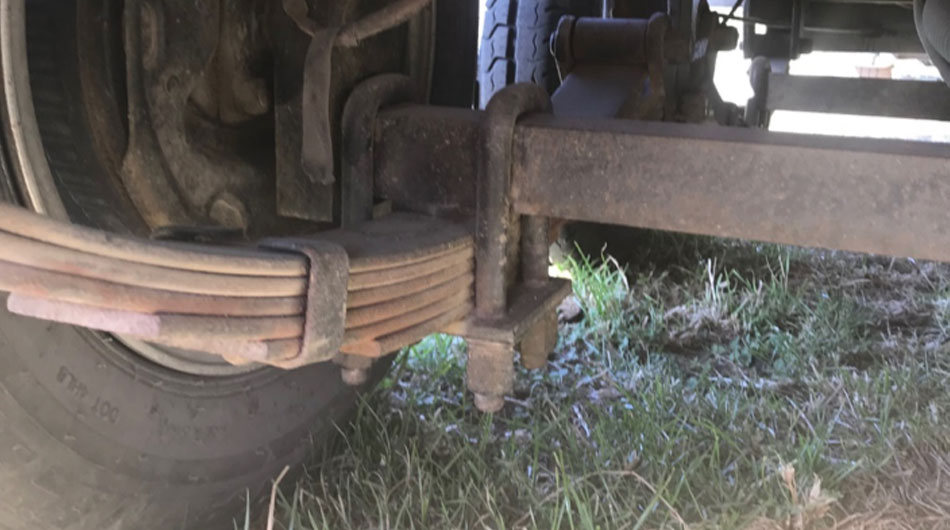
The biggest danger area is rust. Quite simply, bad rust can make a float unsafe and uneconomic to repair. Surface rust means very little. It’s there to be seen and can be dealt with quite easily. The serious rust will develop where water gets into nooks and crannies and cannot easily escape or evaporate away. This will very quickly start eating at the chassis and cause serious damage. Horse floats will often have aluminium treadplate around the front. Ensure it is well sealed along the top edge to prevent moisture penetrating and causing rust. Check there are no gaps at the top of the treadplate. Many floats, particularly round-nosed models, have treadplate aluminium sheeting mounted around the front to absorb stone impacts. Make sure the top edge of this aluminium is well sealed with a silicon-based sealant. Water seeping behind it will quickly rust the steel sheeting tucked in behind. You need to get under the float and check for rust. Take a screwdriver with you and probe areas of surface rust to make sure they’re just that – on the surface! Probe any crevices to determine if any rust is more than skin deep. While you’re under there, poke the screwdriver into the floor to check for any rot. Survey the outside of the floor and imagine where rainwater would be running down the outside… are there gaps and crevices where it is likely to flow? Check these areas very carefully. Check around the welds on the chassis, particularly where the axles and leaf springs attach, to make sure that rust has not weakened these crucial points. Look for other tell-tale signs… is there any evidence (dampness or staining) that water has regularly got inside the compartment of the float? 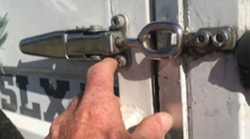
Rear latching door systems
There are several options for rear door latching systems. Whatever you choose, make sure it is of good quality and heavy duty. |
Brake systems
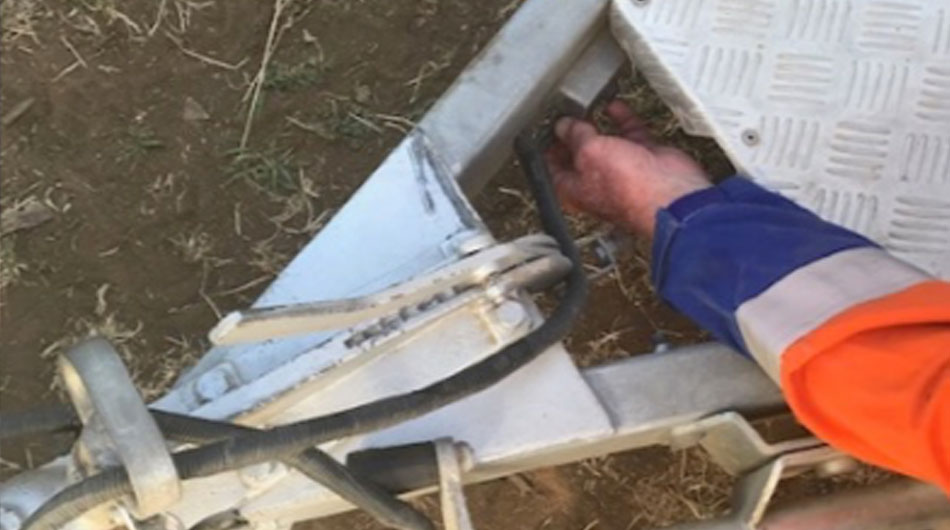
If the float has hydraulic brakes, you’ll notice that the coupling is attached to a hydraulic ram. These work on a simple mechanism. When you’re driving along and apply the brakes, the float’s forward inertia activates the ram, and the hydraulic pressure generated is transferred via the brake hoses to the drum brakes on one of the axles. Once the float loses its forward momentum, the brakes disengage. Check the brake fluid reservoir. Take off the filler cap and check the brake fluid is clean and at the correct level. Are there signs of fluid leaking? Get back under the float and check around the brakes on each wheel for any signs of leaking brake fluid. Brakes, too, can be costly to fix. Leaks from the brake cylinders not only point to the need for repairs, but the fluid can ruin the shoes or disc pads, meaning more expense. Modern floats typically use electric brakes which operate off the car’s brake system, engaging when the driver puts their foot on the brake. They are superior to hydraulics and have a lower maintenance requirement,as long as the vehicle- to-car connection is well-maintained. 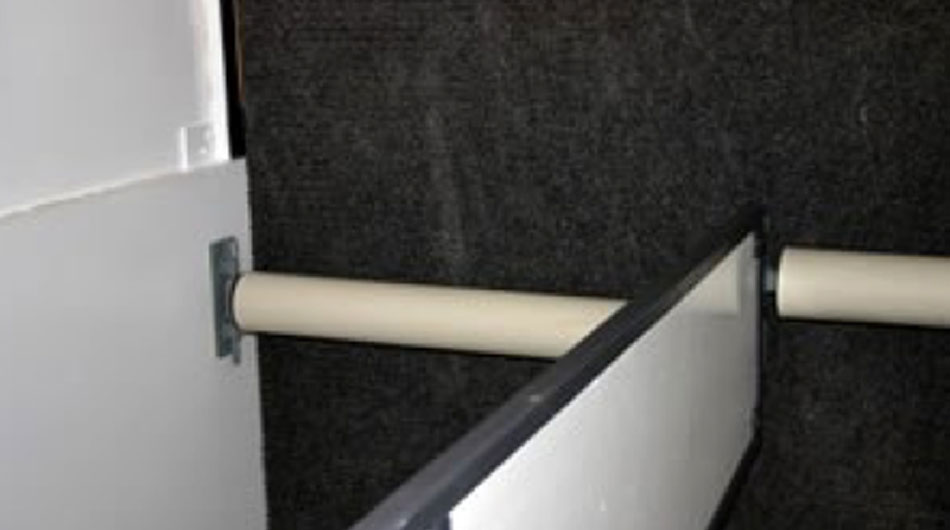
Chains or bars across the rear?
Whichever is the design of the float for sale, make sure the chains or bars are solidly connected to the float and are not flimsy. Generally, bars are considered to be better. |
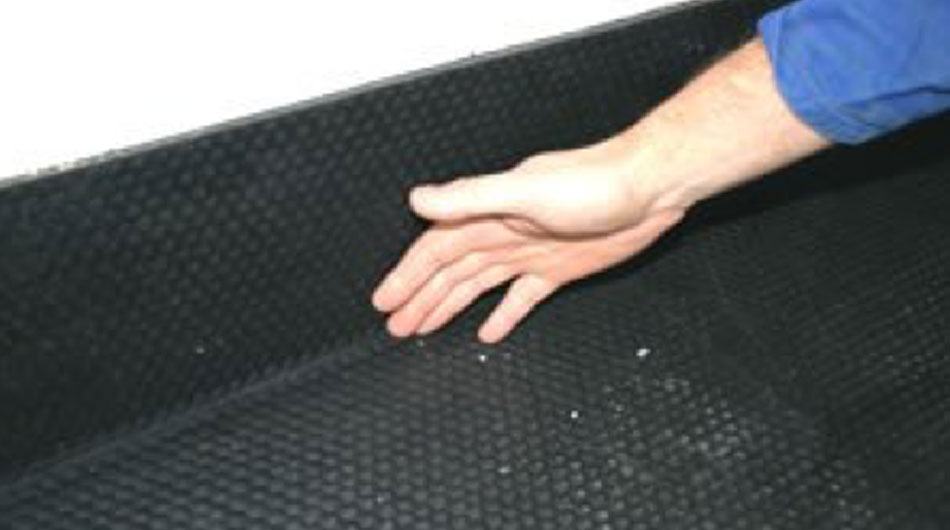
Floor coverings
Check that impervious floor coverings are properly sealed around the edges, as urine or water that penetrates can trigger rust. The surface of the floor is crucial. Many modern floats have rubber or Ruthane floors, which seal the floor surface. This is great for the horse owner, who can hose out the float once the horses are back home. But there is one thing you must bear in mind: if your floor surface is permanent, as in Ruthane or stuck-down rubber, it MUST be watertight! If the watertightness is compromised, then water or urine seeping through may well have trouble drying out. This is a sure recipe for rot and rust. Horse Float Features
Every horse-owner has differing views on what features are desirable or otherwise on a float. There are so many potential traps and, sadly, many older floats come up short in key areas of safety, be it dangerous gaps around the rear gate springs or rear door couplings that can catch a horse’s neck. Some owners are happy with rear chains to keep their horse in when the ramp is dropped; others insist on having bars. A moveable divider between the bays is very handy for loading uncertain horses or for scramblers who need more room to balance themselves. |
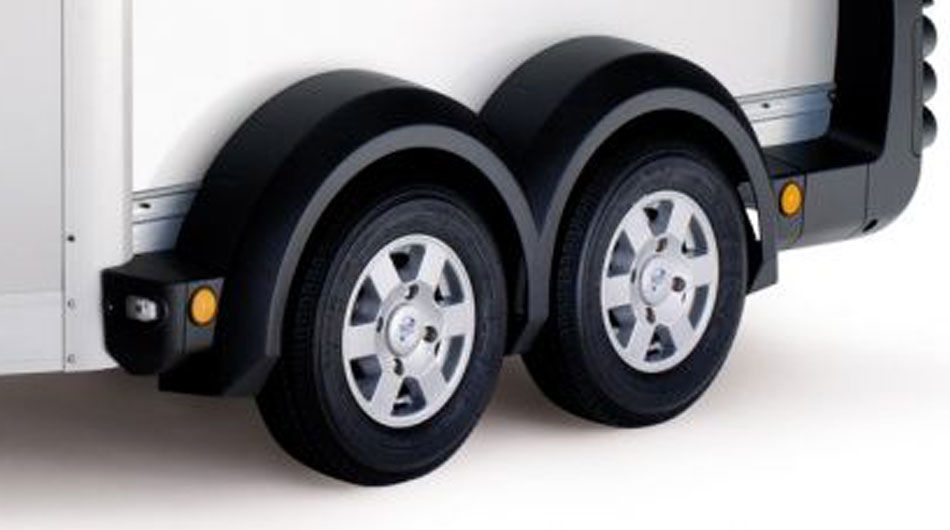
Tyres & wheels
Tyres need at least 2mm of tread depth (about matchhead depth) to pass a warrant safety check. Check each tyre for wear. If they’re wearing on either the inside or outside, there is clearly an alignment problem, which might be expensive to fix. If the tyres are wearing excessively in the middle, this is normally a sign of over-inflation. Excessive wear on both outer edges normally means the tyres have been under-inflated. Both these problems are easily remedied but bear in mind that a tyre which is wearing unevenly will usually continue to do so, even once the pressure has been corrected. Check the side-walls of all the tyres for cuts and cracks, which will fail a safety check, even with enough tread depth. Jack up the float, one side at a time. Grab each wheel and check for any sideways motion, which could indicate wear in the wheel bearings. Rotate the wheels with your hands on them and try to sense any roughness in the bearings. Then spin each wheel, which should run smoothly. When you have each side jacked, apply the handbrake lever near the tow coupling. This should bring the braked wheel on each side to an immediate halt. If not, there’s a problem with the brakes. |
Towing
It’s essential you take it for a tow with the vehicle you intend using to pull it. Hook up the float, having first ensured the coupling is compatible with the tow ball. New Zealand has two standards for tow balls and couplings: the metric 50mm version and the imperial 1 7/8 inch. The imperial coupling dominates the market. Do not mix your couplings. You may need to change your tow ball to match the float coupling. Some modern float couplings can be adjusted to accommodate either ball. Check first, or you run the risk of your float coming adrift on the way home. Make sure your tow bar is rated to take the weight of the float (there should be a sticker on the tow bar with its weight rating); and make sure your vehicle is considered capable of towing a float. This may very much depend upon whether the float is braked, or unbraked. Before going anywhere, stand back and survey the “package”. The float should be sitting nice and level, and not exerting too much downward pressure on the tow bar. If the back of your vehicle sinks dramatically with the float attached, there is something seriously wrong with the dynamics of the float. Some four-wheel-drives have raised suspension. This is quite a common modification in Toyota Landcruisers, for example. These raised four-wheel-drives throw a float back on its haunches, which, again, ruins the towing dynamics. If you’re ever buying a four-wheel-drive with the intention of towing a float, it’s probably best to steer clear of those with lifted suspension. |
Independant assistance to buy
There are plenty of buyers around for good floats advertised each weekend, so you may not have the luxury of having a mechanic or engineer check it over on the Monday. If you don’t feel confident in assessing a float yourself, find someone you have confidence in to go with you to view it and make the call.
There are plenty of buyers around for good floats advertised each weekend, so you may not have the luxury of having a mechanic or engineer check it over on the Monday. If you don’t feel confident in assessing a float yourself, find someone you have confidence in to go with you to view it and make the call.
Summary
It pays to do your homework. There seem to be a growing number of horsefloat manufacturers in the market.
Before you go looking for a second-hand float, check out some of the new ones so you’re sure you know what your “ideal” float would cost. This puts you in a far better position to judge whether that $10,000 second-hand float really does represent good buying. Remember that older floats may not have a galvanised chassis. Bear in mind, too, that floats are best to run light truck tyres, which are more expensive than car tyres. If that tandem-axle second-hand float will be needing a new set within a year, it may make the economics look pretty ugly. Bear in mind, too, that many older floats may not have the safety innovations of their newer counterparts.
Not everyone can afford the luxury of a new float. But the last thing any buyer wants is for their second-hand float to end up costing as much as a new one, once they carry out the needed repairs. If you’ve found the ideal float, well done! Enjoy many kilometres of safe travel.